

Kubernetes is an open-source orchestration framework, in less complicated terms, it's a tool for managing and automating containerized workloads within the cloud. Developed by Google in 2014, however, is presently being maintained by the Cloud Native Computing Foundation.
Kubernetes is the tool that orchestrates and handles the modification in workloads and conjointly scales containers across multiple machines. It primarily acts because the conductor of the container(e.g docker) thereby setting the tempo of the operation and managing the containerized applications in totally different readying environments example: local, cloud and hybrid environments.
Problems Kubernetes solve in the Real world
The rise in microservices caused increased usage of container technologies because they offer the perfect house for small independent applications and the rise of containers resulted in applications that comprised hundreds or thousands of containers which became difficult or even impossible to manage across multiple environments using scripts and self-made tools brought rise to Kubernetes.
The Basic Architecture of Kubernetes
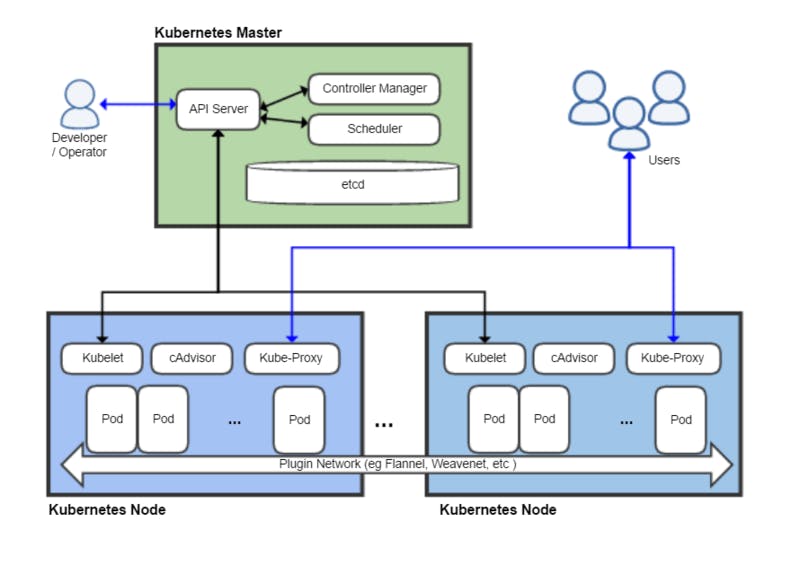
Control Plane / Master Node
The control Plane is the brain of the operation in Kubernetes, it exposes an API server that can handle both internal and external requests to manage the cluster and also contains its key-value database called ETCD. It is managing one or more worker machines called Nodes and is responsible for maintaining the Desired State of any object in the cluster.
Composition of the master node
API Server: This is the entry point to the Kubernetes cluster dashboard, it makes calls through HTTPs to the cluster, communicate with other control plane’s component that is ‘etcd’ data store, then fetches the data and sends them back to the console via HTTPs which enables us to see the details of nodes on our terminal.
Controller manager: This is responsible for running controller processes, it keeps track of what is happening in the cluster and checks for repairs.
The controller manager ensures that the current state matches the desired state, if the current state does not match the desired state, it makes appropriate changes to the cluster to achieve the desired state.
Scheduler: This is responsible for scheduling containers on different nodes based on workload and available server resources, it handles scheduling newly created pods to the best available nodes to run in the cluster.
ETCD: etcd is the default data store for Kubernetes that stores all cluster data and information about managing the cluster, the etcd is only accessible by the API server, So if the control plane wants to access the etcd, it has to go through the API server.
Virtual network: This enables the work nodes and master nodes to communicate with each other.
Worker Nodes/Nodes
A Node is simply a working machine in a Kubernetes cluster, each node runs a Kubelet, which is a tiny application that controls the main control plane. The kubelet makes it possible for the clusters to communicate with each other where a group of nodes that runs containerized apps is called a Cluster.
Inside each node, there are multiple Pods which are containers running together. As the workload increases, Kubernetes adds more nodes to the cluster thereby scaling horizontally in the process, it takes care of networking, secret management, persistent storage etc.
Importance of Kubernetes in the real-world application
High availability: Kubernetes can automatically manage the availability of applications by ensuring that they are deployed across multiple nodes in a cluster, providing resilience in the event of node failure.
Scalability: Kubernetes allows for the automatic scaling of applications, which is crucial in a dynamic environment where the number of users and demand for resources can change rapidly.
Automation: Kubernetes automates many of the tasks involved in the deployment and management of applications, reducing the time and effort required by developers and IT operations teams.
Configuration of a Basic Kubernetes Container
Before we begin, we need to have a Kubernetes cluster and a popular tool that can enable us quickly sets up a local Kubernetes cluster are:
“minikube” And “kubectl”;
minikube is an open-source tool that allows us to run a single-node Kubernetes cluster locally. This is a great tool to try out Kubernetes.
kubectl is a command-line tool that allows us to run commands against our Kubernetes cluster and must be configured to communicate with your cluster.
Minikube Installation guide:
After installation, start your minikube cluster and make sure kubectl is working properly as well.
Using:
$ minikube start
List of required fields for every configuration object
apiVersion: Specifies the version of the Kubernetes API, we will be using to create our Kubernetes object.
kind: Specifies the type of Kubernetes object we are trying to create.
metadata: It could be referred to as data that helps uniquely identify the Kubernetes object, including a name string, UID, and optional namespace.
spec: Specifies the desired state of our object.
Desired state here implies -"A description of the characteristics we want the resource/object to have. For example, the image you want to be run on the object, number of cluster replicas, ports, memory & CPU limitations etc."
Creating Objects
A Pod is meant to run a single instance of our application on the Kubernetes cluster and Deployments manages the pods below them, So if we create a deployment object, it handles the creation of the pods, well talk more about that under deployment, Let's write a template that creates a basic pod in Kubernetes.
apiVersion: v1
kind: Pod
metadata:
  name: firstapp-pod
spec:
  containers:
  - name: myapp
    image: <Image>
Line 1: specifies the version of our app.
Line 2: defines the type of Kubernetes object we are trying to create.
Line 3: defines our object name and other information relating to our object identity.
Inside is where we define our object name, As seen in our template file.
Line 5: we start specifying the desired state of our application.
Note: The Yaml file arrangements are always formatted with indentation to specify the order, be sure to observe that when writing your file.
To create our object, move to the directory we created our Yaml file using our terminal and run:
$ kubectl apply -f <filename>.yaml
Congrats, we have created our first object on Kubernetes
To check for information about our pod, we can run
$ kubectl describe pod <filename>
// filename describes the name of our newly created pod file
Deployment on Kubernetes
Deployments will automatically manage the application lifecycle, run the requested number of pods/replicas, monitor them, and if a pod dies it will automatically re-create it, which brings about the concept of Self-Healing which is a feature of Kubernetes where if a containerized app or an application component goes down, Kubernetes will instantly redeploy it, matching the desired state written in the Yaml configuration file.
There are two ways to create a Kubernetes deployment.
Imperative: Use a CLI command to create a deployment
Declarative: Describe a desired deployment state in a Yaml(or JSON) file and apply the deployment
While the imperative method can be quicker initially, it has some drawbacks. It’s hard to see what’s changed when you’re managing deployments using imperative commands.
The declarative method, on the other hand, is self-documenting. Every configuration is in a file and this file can be managed.
Let's write a template that creates a basic deployment in Kubernetes using both methods.
imperative method:
Run this command on your terminal, it automatically creates our deployment and you don't need to write any configuration file.
kubectl create deployment first-deployment –image nginx –port=80
declarative method:
apiVersion: apps/v1
kind: Deployment
metadata:
  name: my-app
spec:
  replicas: 3
  selector:
    matchLabels:
      app: my-app
  template:
    metadata:
      labels:
        app: my-app
    spec:
      containers:
      - name: my-app
        image: my-app:latest
        ports:
        - containerPort: 80
Up till now, there have not been many changes to our 4 mandatory fields, just a few additions like label, selector and template.
In our deployment template example:
Our Deployment named
first-deploymentis created and written in the metadata which handles the template object's identity.The Deployment creates a ReplicaSet
replicasthat creates three replicated Pods, which are our desired states written in our spec.labels: Labels are key-value pairs attached to the object that helps to organize and to select subsets of objects.The
selector:A field inside our spec defines how the created ReplicaSet finds which Pods to manage.The
template:This Specifies the desired state of our pod, it specifies the container image to use (my-app:latest), and the port that should be exposed (80) e.g NginxNginx is a multifunction tool, it can act as a web server that can also be used as a reverse proxy, load balancer, mail proxy and HTTP cache.
Before you begin, make sure your Kubernetes cluster is up and running.
Now, let's create our Deployment;
Create the Deployment by running the following command:
kubectl apply -f first-deployment.yamlRun:
kubectl get deploymentsto check if the Deployment was created, and get our Deployment details
Output example:
 NAME               READY   UP-TO-DATE   AVAILABLE       AGE
 first-deployment   3/3         3            3           10s
When you inspect the running Deployment in your cluster, the following fields are displayed:
NAME lists the names of the Deployments in the namespace.
READY: displays how many replicas of the application are available to your users. It follows the pattern ready/desired.
UP-TO-DATE: displays the number of replicas that have been updated to achieve the desired state.
AVAILABLE: displays how many replicas of the application are available to your users.
AGE: displays the amount of time that the application has been running.
To get individual pods running on our deployment, run:
kubectl get pods -l app=first-deployment
We have successfully run our first Deployment on Kubernetes and understood the basic concepts of Containerization on Kubernetes.
Conclusion
Kubernetes has some exceptional features that have a positive impact on the business as a whole. It is one of the most inquired-after skills by companies of all sizes, so if you are looking to obtain this new skill that can guide you throughout your career, discovering Kubernetes is an excellent option.